Installing rubber flooring isn’t just about rolling out mats or tiles, it’s about creating a surface that stands the test of time. One of the most critical factors in that longevity is the choice of rubber floor glue. A poor adhesive job can undo all your efforts, while the right product ensures stability, safety, and performance.
In this article, we’ll break down everything you need to know about choosing, applying, and maintaining rubber floor glue for the best results.
Why Rubber Flooring Needs Specialized Adhesive
Rubber is a dense, flexible material that naturally resists most common adhesives. Because of this, it requires glues specifically designed to bond with its surface. Using unsuitable adhesive can cause bubbling, warping, or lifting, which compromises the safety and look of the flooring.
Whether you’re working in a gym, garage, warehouse, or commercial setting, rubber floor glue ensures that your flooring remains intact even with constant foot traffic, machinery, or moisture.
Types of Rubber Floor Glue and Their Applications
There’s no one-size-fits-all adhesive when it comes to rubber flooring. Here are the most common types and where they work best:
1. Pressure-Sensitive Adhesive (PSA)
- Best for: Indoor spaces with moderate foot traffic
- Pros: Easy to apply, repositionable, low odor
- Cons: Not ideal for wet areas
2. Polyurethane-Based Adhesive
- Best for: High-traffic or high-moisture environments
- Pros: Excellent strength, moisture resistance
- Cons: Requires proper ventilation during application
3. Water-Based Acrylic Adhesive
- Best for: Eco-conscious or low-VOC applications
- Pros: Low odor, environmentally friendly
- Cons: Not as strong in wet conditions
Choosing the right type of glue depends on both your subfloor and the expected usage of the space.
Preparing for a Successful Adhesive Installation
Before you even open the glue container, make sure the subfloor is ready. This step is critical for a long-lasting bond.
Subfloor Preparation Checklist:
- Sweep and vacuum to remove dust and debris
- Repair any cracks or uneven areas
- Make sure the surface is dry and moisture-free
- Ensure the room temperature is stable (typically 65°F to 85°F)
Acclimating both your rubber flooring and adhesive to the room for 24–48 hours is also highly recommended. This prevents expansion or contraction after installation.
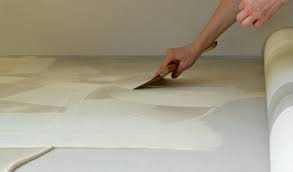
How to Apply Rubber Floor Glue Properly
Here’s a step-by-step method for applying rubber floor glue for optimal results:
- Mark your layout: Plan your flooring pattern in advance
- Apply adhesive with a notched trowel: Spread evenly for proper grip
- Wait for “open time”: Allow the adhesive to set slightly (usually 10–15 minutes)
- Lay the rubber flooring: Press down firmly or roll with a flooring roller
- Let it cure: Avoid traffic for at least 24–48 hours for full adhesion
Avoid over-application. Too much glue can create lumps or cause it to seep through seams.
Common Mistakes to Avoid with Rubber Floor Adhesives
Even seasoned professionals make mistakes. Avoid these common errors:
- Skipping subfloor preparation: This weakens the bond
- Using too much adhesive: Leads to messy and uneven flooring
- Ignoring open and cure times: Results in poor adhesion
- Applying in unsuitable temperatures: Adhesives behave differently in hot or cold environments
Remember, following the instructions on the adhesive packaging is just as important as the installation process itself.
Maintaining Your Rubber Floor After Adhesive Application
Once your floor is in place, proper maintenance will keep it looking and performing its best:
- Wait until the adhesive fully cures before cleaning
- Use a pH-neutral cleaner to avoid damaging the bond
- Inspect edges regularly for signs of lifting
- Avoid dragging heavy furniture directly on the floor
With the right care, rubber floors bonded with quality glue can last for 15 years or more.
Conclusion
The adhesive you choose for your rubber flooring project can make or break the installation. From selecting the correct rubber floor glue to preparing your surface and applying it with care, every step is essential. Avoid shortcuts, follow best practices, and you’ll be rewarded with a safe, durable, and attractive rubber floor for years to come.
FAQs About Rubber Floor Glue
1. Can I use any type of adhesive for rubber flooring?
No, rubber flooring requires specialized adhesives. Standard wood or tile glue usually won’t bond properly. Using adhesives made specifically for rubber ensures better performance and safety.
2. How long does rubber floor glue take to dry?
Most adhesives take 24 to 48 hours to dry completely, but full curing can take up to 72 hours. It’s best to avoid heavy foot traffic or cleaning during this time.
3. Is rubber floor glue waterproof?
Not all types are. Polyurethane-based adhesives are typically moisture-resistant, making them suitable for bathrooms, basements, or locker rooms. Always check the product label before use.
4. Can I remove glued-down rubber flooring later?
Yes, but it can be challenging. You’ll likely need a scraper and adhesive remover. Some pressure-sensitive adhesives make future removal easier compared to stronger, permanent glues.